As I play more with OBIEE, I learn more about what it is capable of and where its main power resides. OBIEE has 3 layers: Physical, Business Model and Mapping, and Presentation. The middle layer, BMM, is what makes OBIEE special: it is where we can define how data from different sources and tables come together and form a nice and clean star schema.
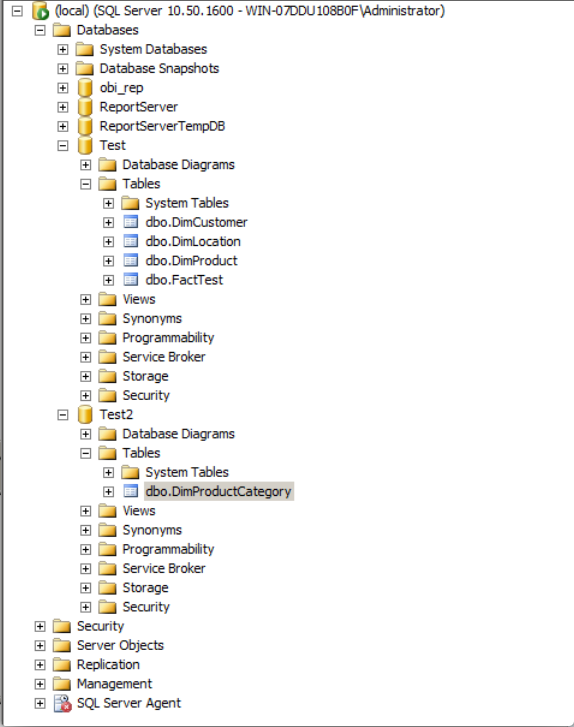
Like most of my posts, I am gonna explain how this is achievable by demonstrating a demo. I defined 2 databases in my local instance of SQL Server. One with 1 fact table and 3 dimensions and another one with a single dimension that will be referenced by one of the dimensions in the first database: DimCustomer, DimLocation, DimProduct and FactTest in database Test and DimProductCategory in database Test2.
Let’s go through the steps to create and design the RPD for our data source. Launch Oracle BI Administrator:
a) Create first database connection:
Click on File and then New Repository. This will launch Create New Repository wizard. As you know, we can define only one data source using Create Repository wizard. I used this wizard to create my first database connection to Test database. I didn’t list steps here because it is very easy and straightforward.
b) Create second database connection:
1- Right-click on Physical pane of Oracle BI Administration Tool and select “New Database..”
2-Provide a name in General tab. Click on “Connection Pools” tab and then click on the green “+” sign.
3- Give the new Connection Pool a name, select the data source pointing to the second database from “Data Source Name” drop-down list and enter appropriate “User Name” and “Password”, as shown below. You will be prompted to re-enter the password after clicking Ok.
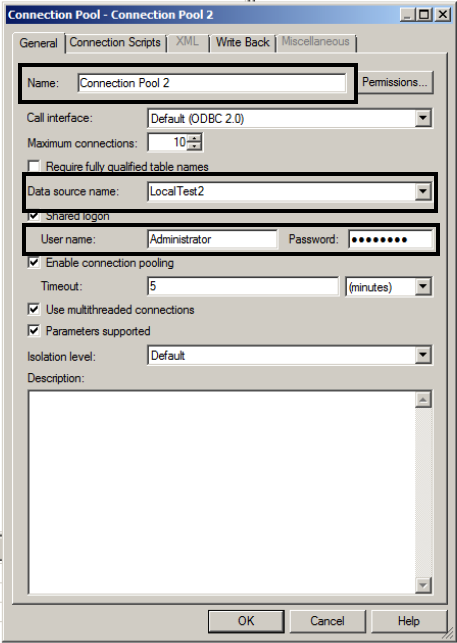
4- Click Ok again in New database window.
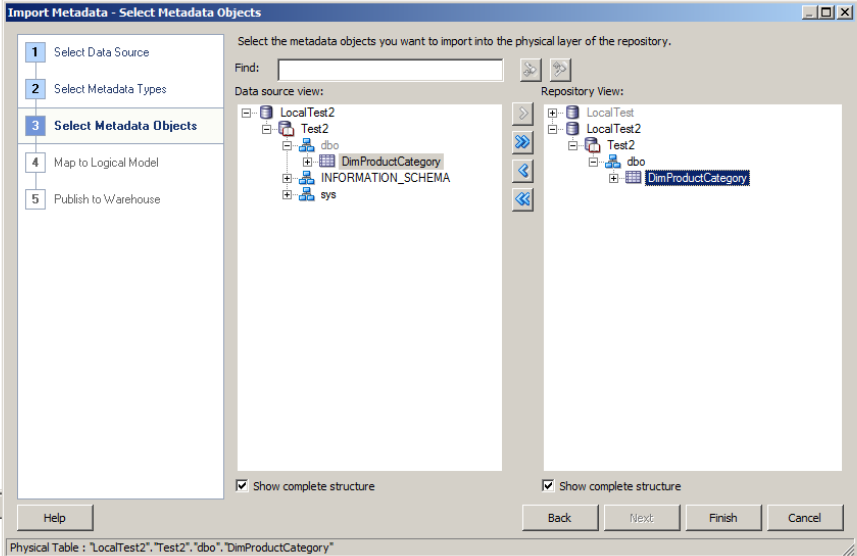
5- Now that we have added a new database and connection pool to our Physical layer, it’s time to add tables to the new connection. Right click on the entry for the new connection pool ( in my case, Connection Pool 2) and select “Import Metadata”. This will launch Import Metadata wizard, where you can select objects that should be added to the Physical layer.
6- Select the type of objects you want to import and click Next. In my tutorial, I select DimProductCategory from database Test2 and add it to Repository View, and then click Finish:
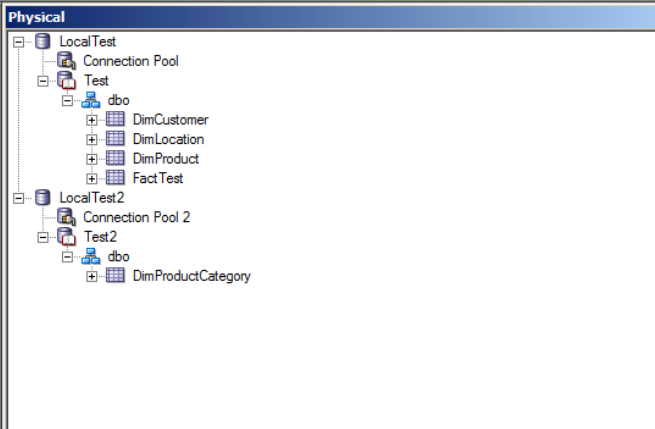
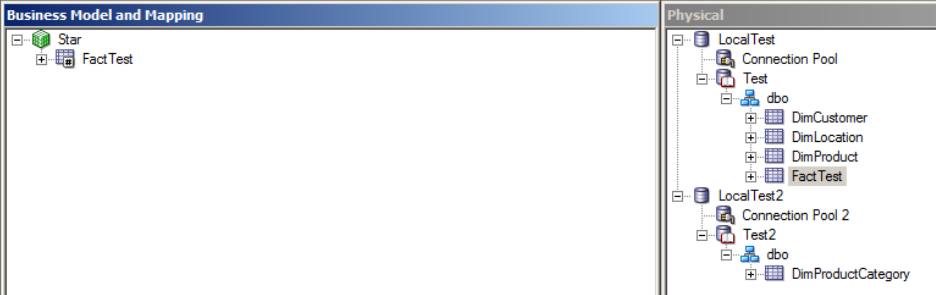
Your Physical layer pane should have 2 entries for 2 database connections and tables imported on each connection. My Physical Layer looks like this:
C) Physical Diagram
Now it is the time to define how tables are joined together in Physical layer.
1- Select tables from both connections, right-click and select “Physical Diagram” and then “Selected Object(s) Only”.
I didn’t define any foreign keys in my database, therefore I’ll get none of the tables related together in my initial physical diagram and I have to define how tables are joined manually.
2- To define the first join, click on New Join button, click on the fact table and then on DimProduct. This will create a join between those 2 tables based on the columns with the same name. You can change this in the next window that opens, “Physical Foreign Key”:
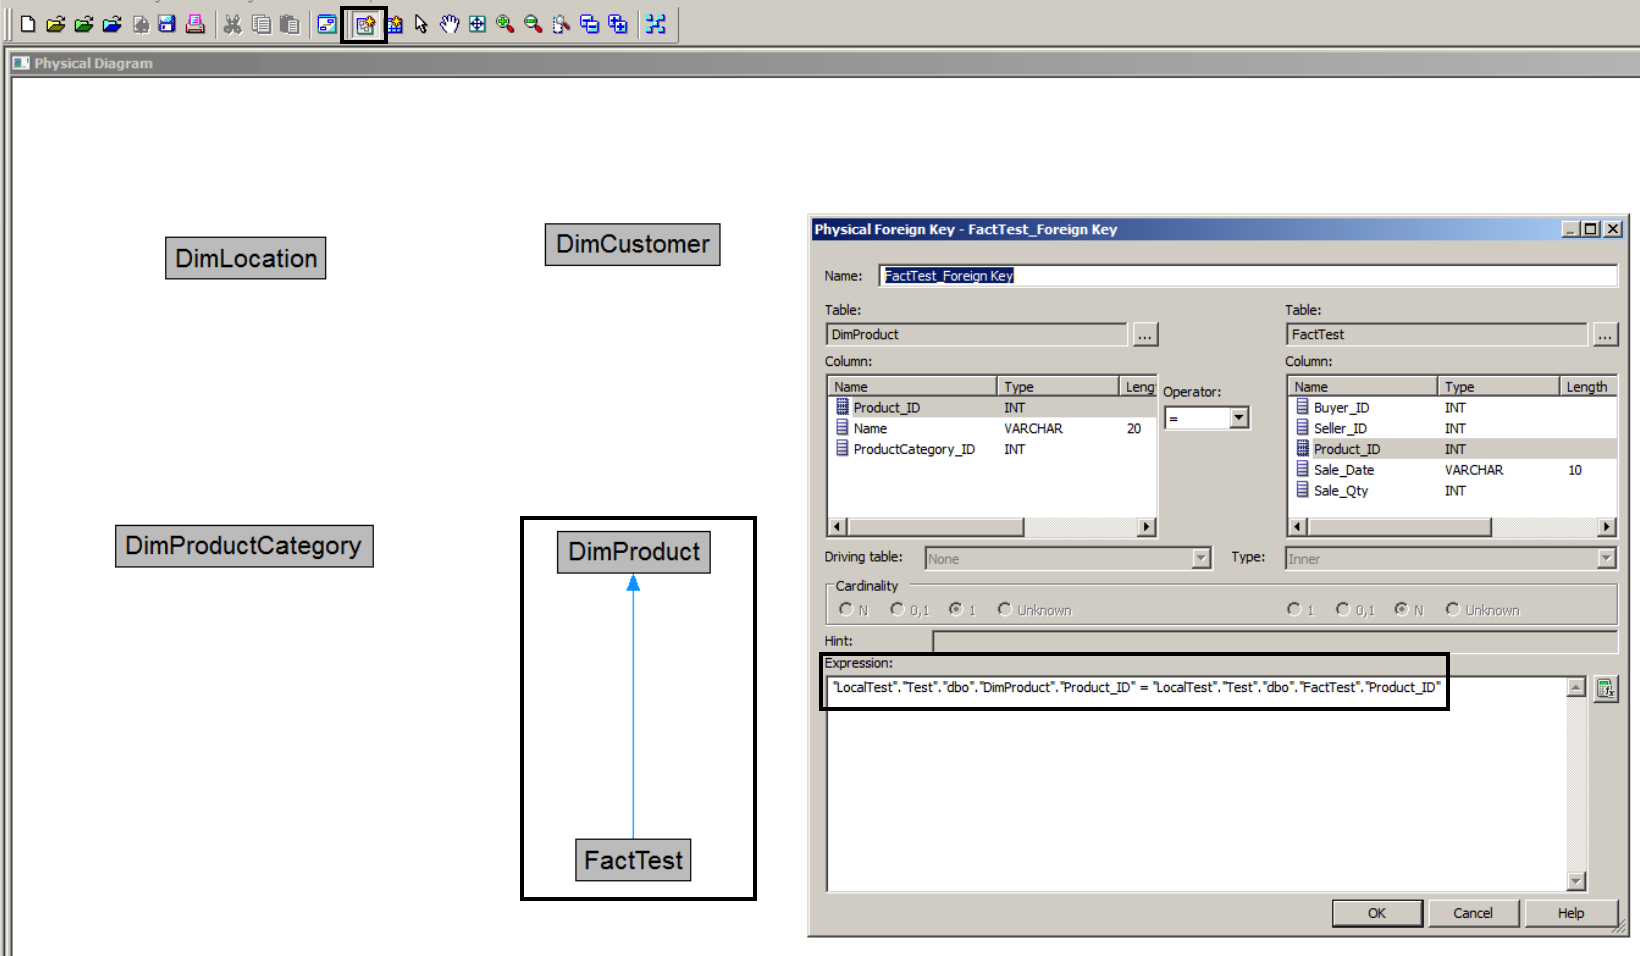
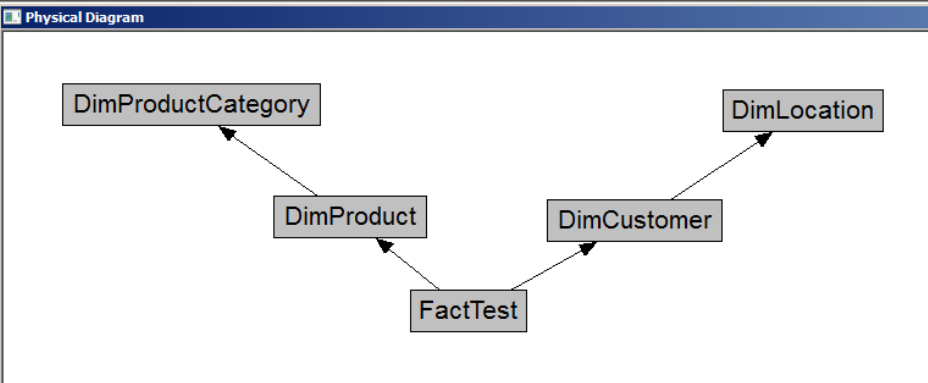
3- Do the same for the rest of the joins, including DimProduct and DimProductCategory. Note that there is no difference between joining the tables on the same database and tables that are on different databases. My diagram looks like this after setting up the join between all tables:
d) Business Model and Mapping
After finishing with physical layer, it is time to define the business logic in BMM layer. In this section, we are gonna create a new Business Model, add objects from Physical layer to it, and define our Star schema on top of snow-flake diagram we created in physical layer by combining DimCustomer & DimLocation into one dimension, and DimProduct & DimProductCategory into another.
1- Right-click in Business Model and Mapping pane and select “New Business Model..”. Give your model a name and un-check Disabled checkbox.
2- Drag and Drop your fact table (FactTest) into the new BMM model:
3- Now it’s time to combine our first tables together and create a single dimension. Let’s start with DimProduct and DimProductCategory, the 2 tables that reside on separate databases. We will use “Logical Table” to do this. Right-click on Business Model, then “New Object” and then select “Logical Table…”. Logical Table window will open.
4- Give your new logical table a name in “General”. Let’s call it DimMasterProduct.
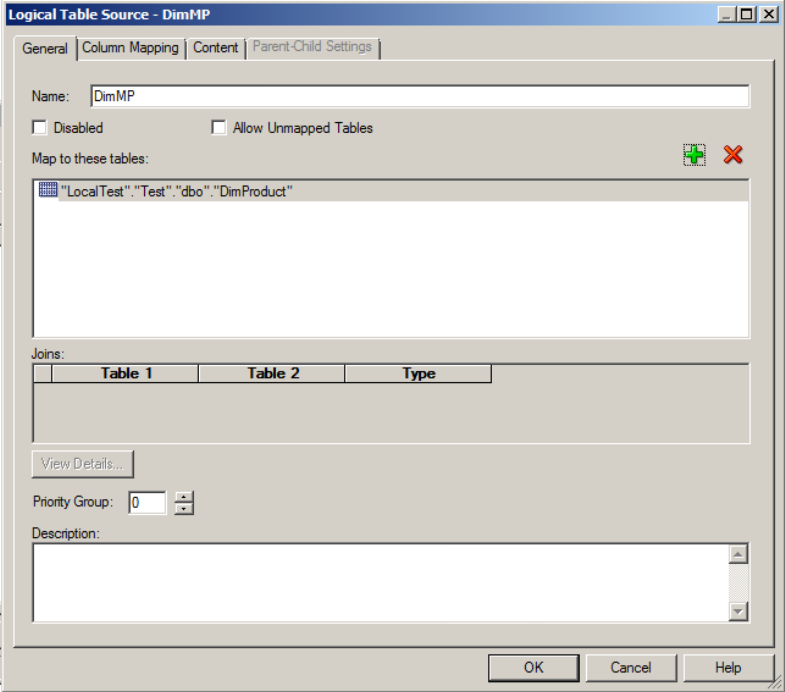
5- Click on “Sources” tab. As its name implies, this is where we can define the source(s) for our new logical table from tables available in Physical layer. Click on the green “+” button. Logical Table Source window opens.
6- Give it a name.
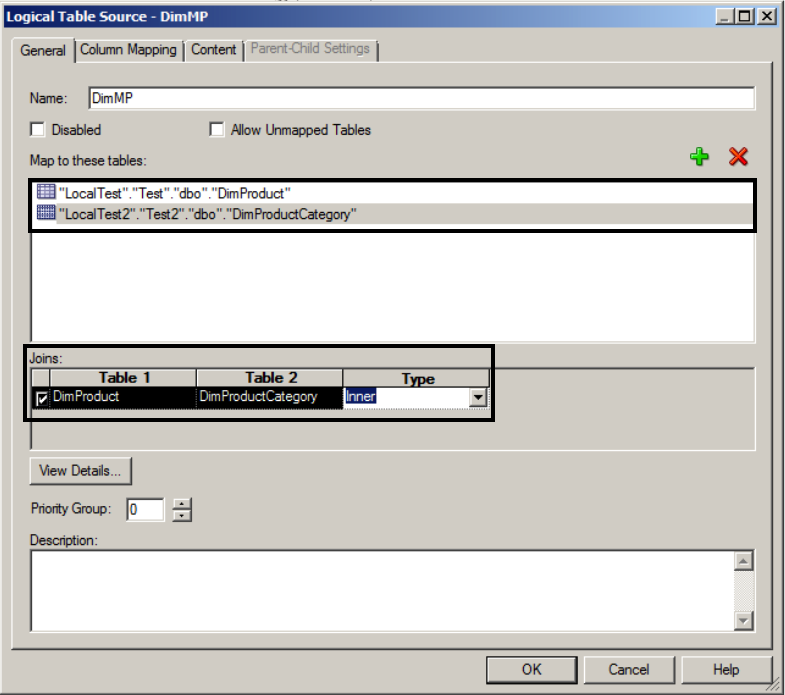
7- The next step is very important: click on green “+” button below Name textbox, to map it to a physical table. A new window open which lists all the tables used in our Physical diagram:
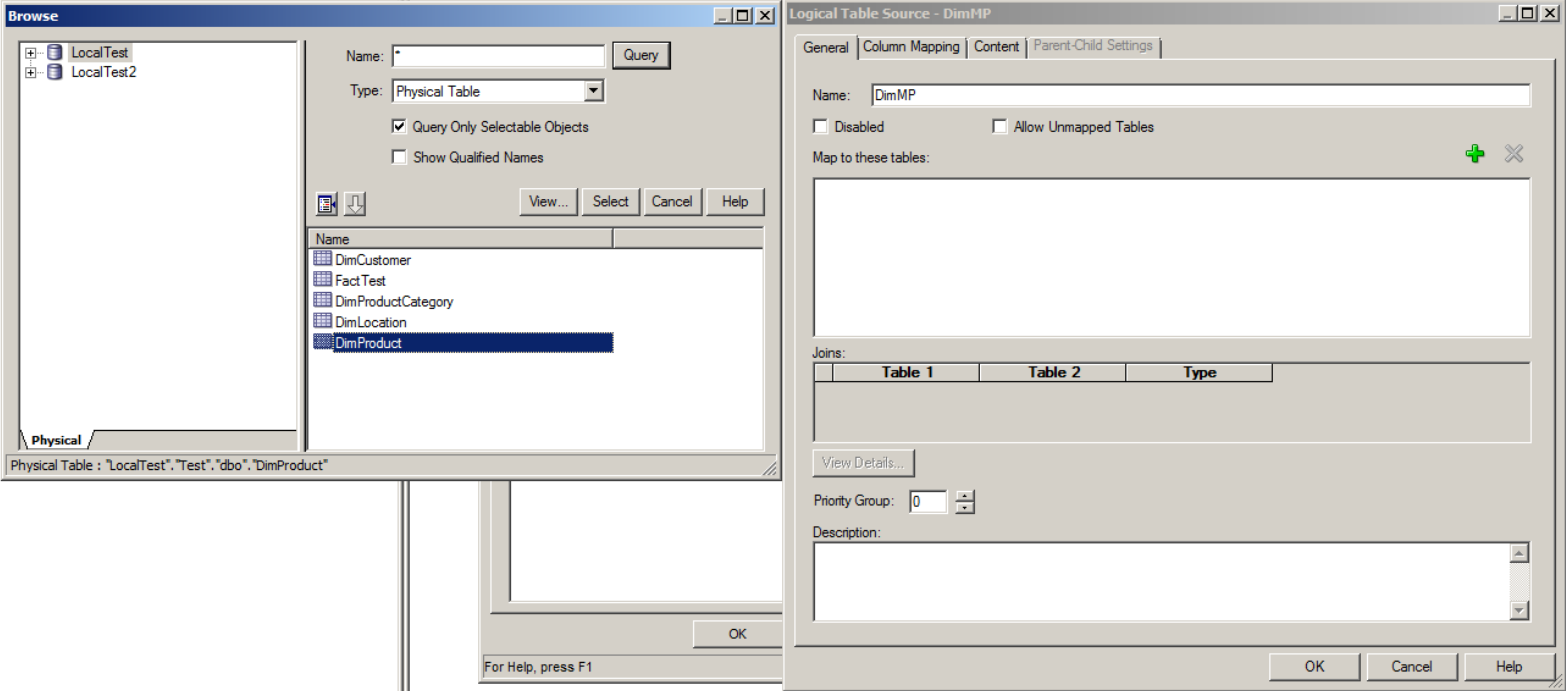
Click on DimProduct and then click “Select” Button. You’ll see Logical Table Source window again, with DimProduct added as the source:
8- Click on the “+” button again to add another table. You’ll see that instead of all tables in Physical layer, only those that are joined to DimProduct in Physical Diagram are listed here. Select DimProductCategory. You’ll see a new Join is defined and you can change it from inner join to right or left join:
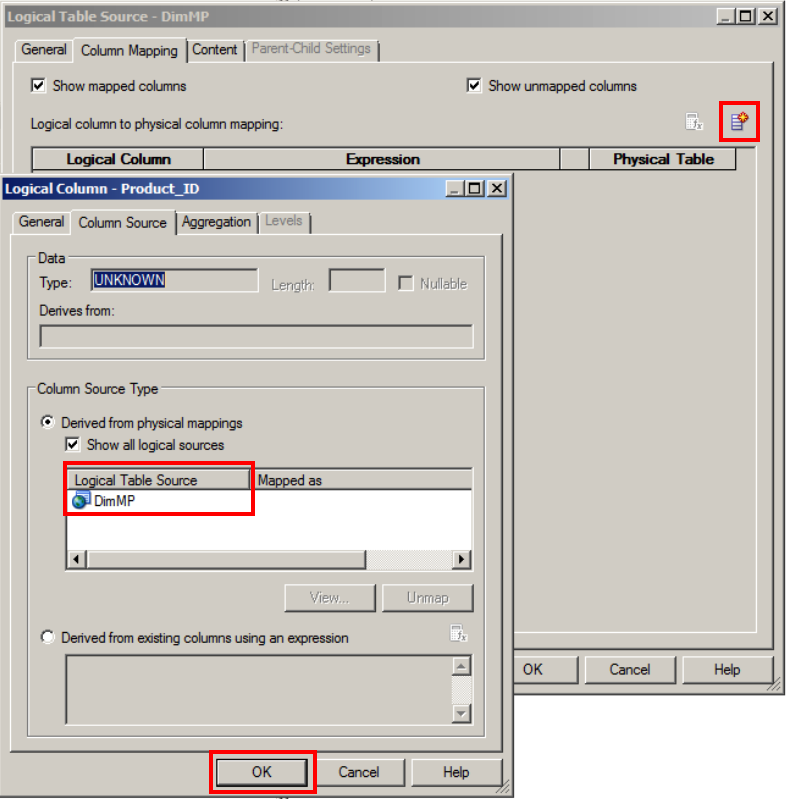
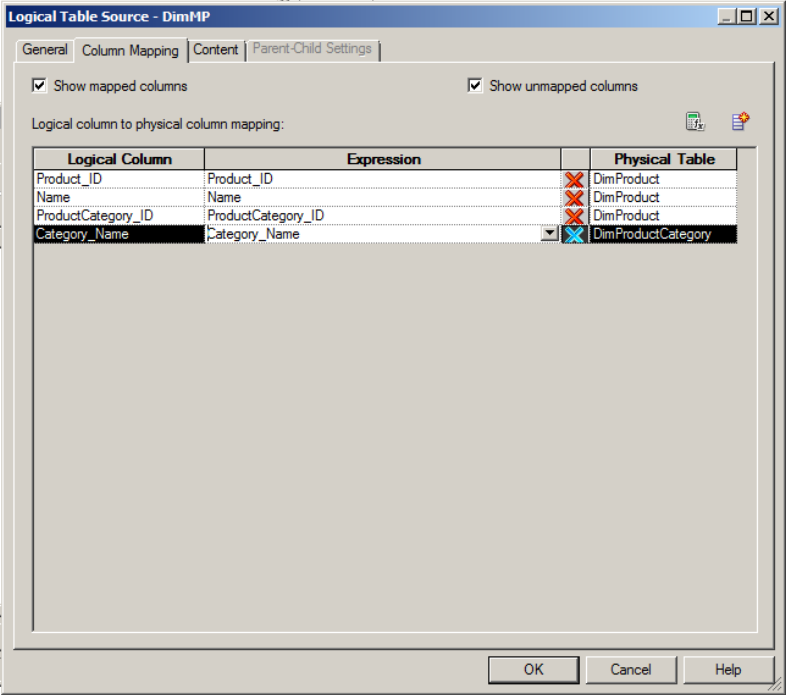
9- Click on “Column Mapping” tab. Here we can add the columns from our sources to our logical table. Click on “Add New Column” button. Logical column window opens.
10- Give your new column a name (Product_ID). Click on “Column Source” tab. Select (Click) the logical table source you created in previous step and click OK:
A new Logical Column is added to the “Column Mapping” tab of “Logical Table Source”. Select the right column from Expression drop-down list:
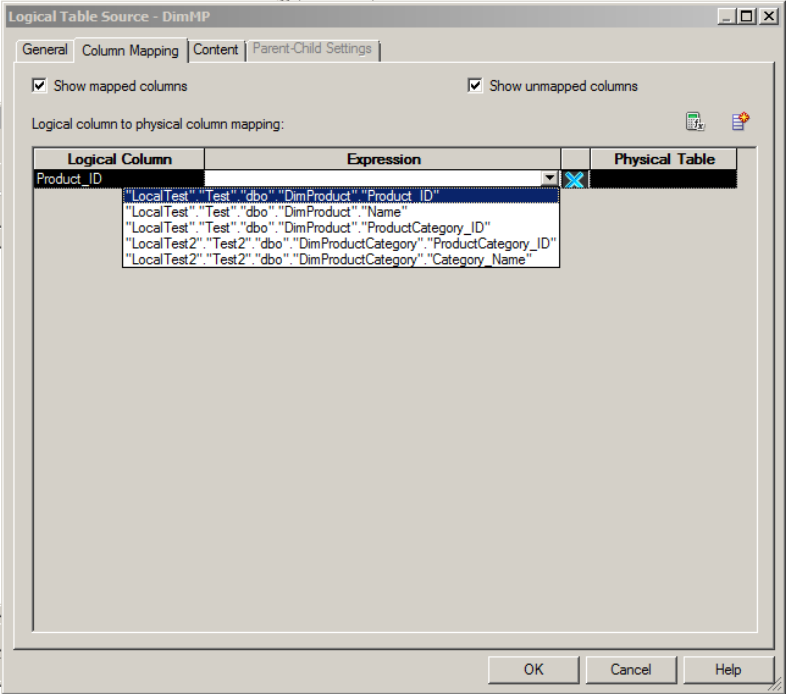
11- Repeat the steps to map the rest of columns for the logical table. I added 4 columns, as shown below:
Click OK to go back to Logical Table window. Click OK to exit Logical Table window.
e) Business Model Diagram
Notice that both FactTest and DimMasterProduct have a # mark on them, implying they are Fact tables. OBIEE will treat all tables with no join pointing to them in BMM layer as fact tables. To change this, we need to define our “Business Model Diagram”.
1- Right-click on your Business Model and select “Business Model Diagram”, and then “Whole Diagram”. My 2 tables in BMM layer namely FactTest and DimMasterProduct are shown.
2- Like what we did for Physical Layer, join the 2 tables together by clicking on “New Join” button, and then FactTest and DimMasterProduct. Logical Join window opens:
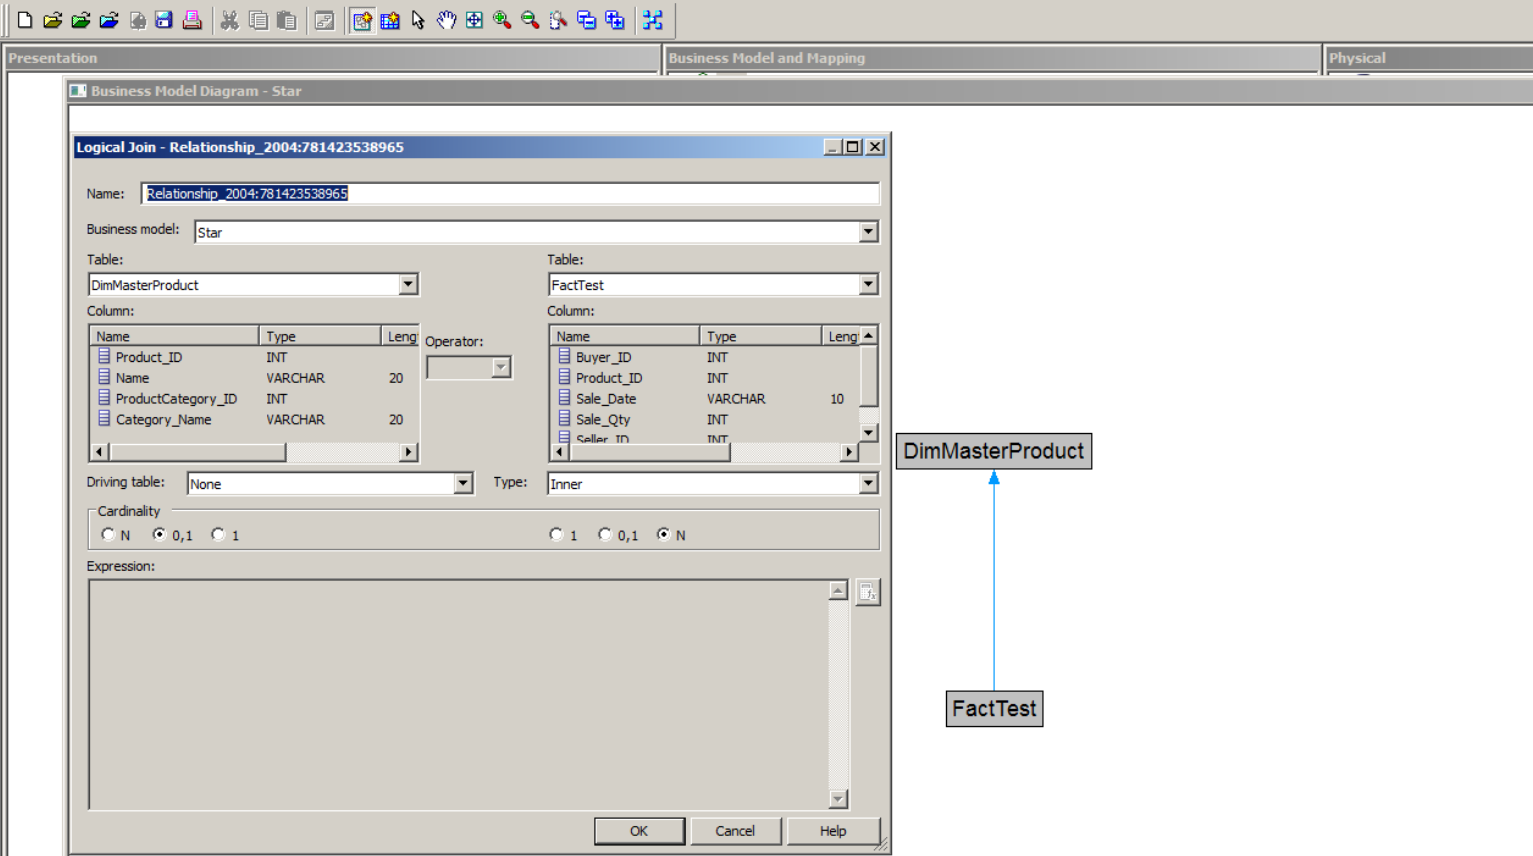
Notices the difference? Here, unlike Physical layer, we don’t need to define which columns will be used to join 2 tables together: OBIEE will work it out based the physical relationship of tables in physical layer.
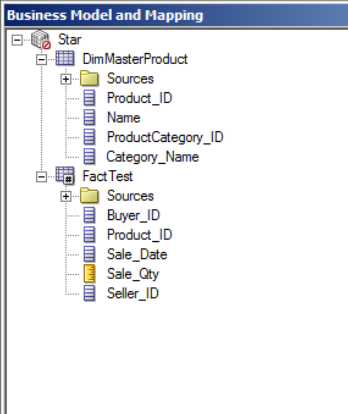
My diagram looks like this now (Note there is no # on DimMasterProduct anymore):
f) Presentation Layer
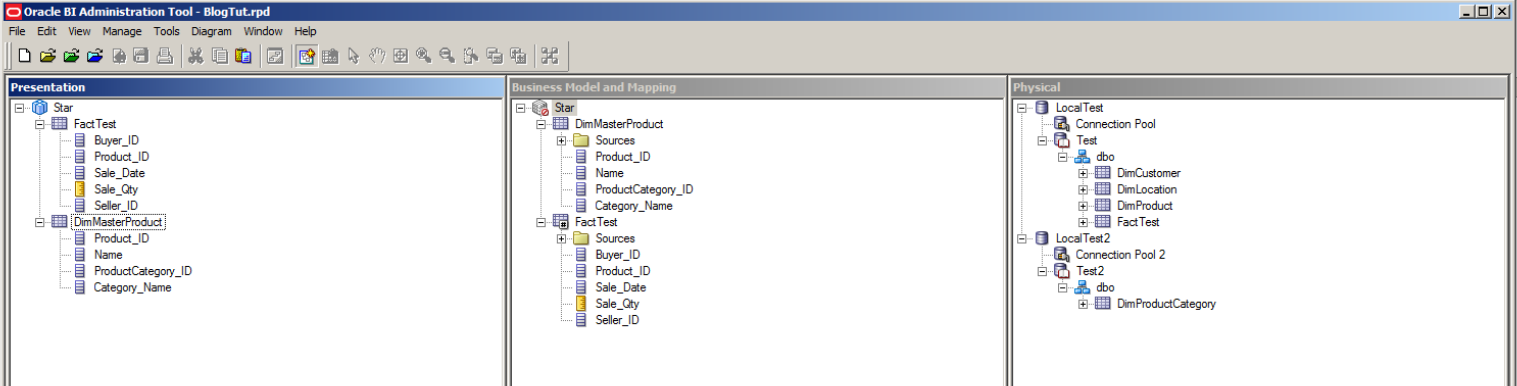
As you know most probably, you can add your BMM model into Presentation layer just by dragging it and dropping into Presentation layer:
Now, save your solution and when asked if you want OBIEE to check Global Consistency, click Yes. You’ll notice global consistency failed with an error on the logical table not having a primary key defined for it:
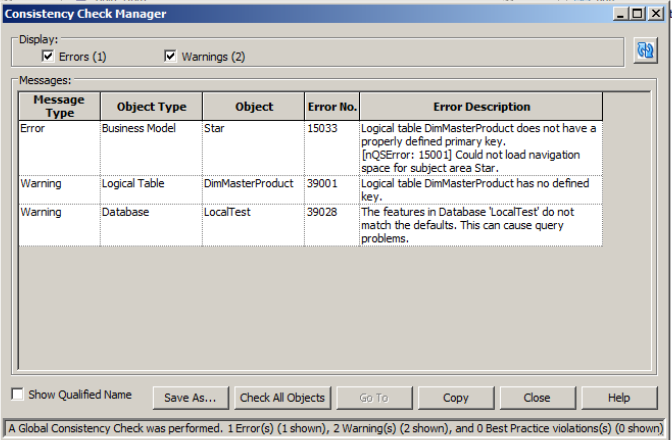
This error can be fixed very easily:
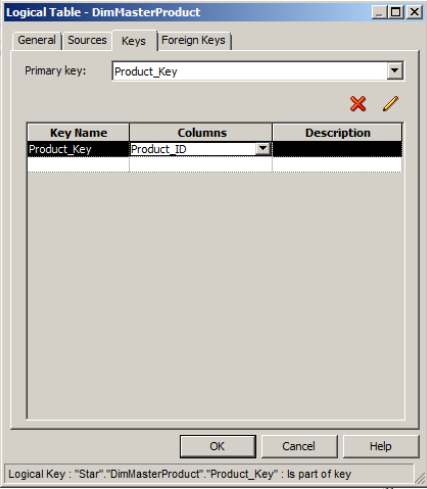
1- Double-click on your logical table’s entry in BMM layer.
2- Go to “Keys” tab. There should be an empty row added.
3- Enter a name for the Key in “Key Name” column.
4- Select the column that is the primary key of your table from “Columns” drop-down.
5- Select the key you just created from “Primary Key” drop-down.
6- Click Ok and save your RPD. Click yes for OBIEE to check Global Consistency.
7- Notice the change in the icon of Business Model in BMM layer.
Now your RPD is ready to be deployed and used for analysis. This method applies to any other scenario where 2 or more tables need to be joined together to create a single dimension: In other words, to convert snow-flake to star schema.
Hope I didn’t confuse you with such a long post,
Cheers.

hi ,
thanks for sharing the knowledge.
i generated the code of the aggregated tables but i cant execute….
im stuck up creating aggregate tables by using aggregattion wizard
please help me on this
im using obiee:11.1.1.6.0
database : sqlserver 2008r2
can we create aggregate tables if u have db as sqlserver?
Hi Sekhar,
You can connect OBIEE to SQL Server and create aggregated tables, like any other database. Did you try to Google the error message you got?
Excellent one….This really helps a lot !!
Hi Saeed,
Thanks for the post. Have you considered a case that dimension has multiple LTS which all supporting attributes in addition table? Take your case as an example, if we have another LTS (e.g. DimParty) along with DimCustomer and DimParty aslo needs to support attributes in DimLocation, can we just use DimLocation as a shared table or should we have to create another copy of DimLocation?
In my project, looks we have to create a copy of DimLocatin. Otherwise, we are going to get error something like:
‘The Table “DimLocation″ is used as the destination of more than one join’.
Thanks,
Mark
That’s right, you need to join to DimLocation multiple times. This post may help you: https://thebipalace.com/2015/02/03/obiee-multiple-joins-between-same-tables-fact-to-dim/
Thanks for your reply. Per my research, in the scenario I described, DimLocation logically is not a dimension but an end of snowflake so it can’t be considered as a conformed dimension and shouldn’t be used as a shared dimension in good practice either. The scenario is more related to advantage of alias of table. Thus, we should create multiple alias if there are multiple usage on the table. This link attached is a reference about alias:
http://dwhlaureate.blogspot.com/2013/07/advantages-of-using-alias-table-in-obiee.html
Thanks,
Mark